
Fire Damage Cleanup vs. Fire Damage Repair: What Is the Difference?

When homeowners begin searching for help after a fire, the terms can become confusing quickly. One company advertises fire damage cleanup. Another offers fire damage repair. A third describes complete restoration. These services overlap, but they are not interchangeable. Cleanup addresses what the fire left on and inside the property. Repair addresses what the fire, heat, smoke or water damaged beyond continued use. Restoration brings those stages together with the goal of returning the space to a safe, functional condition. Understanding the difference makes it easier to compare proposals and avoid finishing one stage with no clear plan for the next. What Fire Damage Cleanup Includes Cleanup generally begins after authorities permit access and an inspection documents the loss. Its purpose is to remove or treat fire-related debris and contamination. Depending on the incident, this may involve controlled debris removal, soot treatment, smoke-residue cleaning, odor treatment and cleaning of salvageable surfaces or belongings. Areas exposed to firefighting water may also require drying and removal of materials that cannot be retained. Cleanup is not ordinary housekeeping. Soot can spread when handled incorrectly, and heavily affected materials may require protective measures and specialized methods. The American Red Cross recommends protective clothing during post-fire cleanup and advises consulting a professional about drywall and insulation soaked by fire-hose water. Its fire cleanup guidance also emphasizes that wet building materials may no longer retain their expected integrity. What Fire Damage Repair Includes Repair begins where cleaning is no longer enough. If drywall is burned, flooring has warped, cabinets are no longer usable or building systems were damaged, those components may need to be repaired or replaced. The work can include carpentry, drywall, flooring, painting, cabinetry and coordination of licensed electrical or plumbing trades. More extensive losses may require professional drawings, approvals or structural work. Repair does not necessarily mean recreating every detail exactly as it was. Some owners restore the original design, while others use reconstruction as an opportunity to improve the layout or select different finishes. Insurance coverage and building requirements should be clarified before upgrades are incorporated into the plan. Why Cleaning Alone May Not Resolve Smoke Odor A surface can appear clean while smoke residue remains within porous materials, gaps or concealed areas. If the odor returns, the source may not have been fully addressed. That does not mean every material automatically requires demolition. It means odor treatment should follow the affected material and contamination pathway rather than relying on fragrance or a quick coat of paint. Read why smoke odors return after a fire for a more detailed explanation of source removal and material treatment. Why Repair Should Not Start Too Early Rebuilding before cleanup and moisture work are complete can conceal unresolved problems. New drywall should not close an assembly that still contains affected insulation or retained moisture. Fresh finishes should not be installed over surfaces that still require soot or odor treatment. The sequence matters: This is one of the few places where a short checklist is useful—the order protects later work from being undone. Where Insurance Documentation Fits Cleanup and repair may appear as separate parts of an estimate, but both should connect to documented conditions at the property. Photographs, measurements and itemized scopes help explain why a surface was cleaned while another was removed. They can also clarify why work outside the room of origin was included. NYTDR’s insurance damage restoration services describe how damage assessment and detailed documentation support the larger restoration process. Coverage decisions remain subject to the individual policy and insurer. Should You Hire Separate Cleanup and Repair Companies? Sometimes multiple specialists are necessary, particularly when the loss involves structural, electrical or environmental concerns. The important question is who coordinates them and carries the inspection findings into the reconstruction scope. When cleanup and repair are completely disconnected, homeowners may face gaps in responsibility. The cleaning team may finish without identifying who will rebuild, while the contractor may arrive without a clear record of what was affected. A full-service restoration company can coordinate the transition, even when specialized trades participate in the work. Our guide to choosing a fire damage repair contractor in NYC provides questions to ask before making that decision. From Fire Cleanup to a Restored Home Fire damage cleanup removes residue, debris and contamination. Fire damage repair rebuilds the parts of the property that can no longer remain. A complete restoration plan connects both. NYTDR provides fire and smoke restoration and construction and remodeling services across New York City, allowing one coordinated team to follow the work from assessment through reconstruction. Contact NYTDR to discuss reconstruction after fire damage in NYC.
Different Kitchen Cabinets: Styles, Materials, and How to Choose
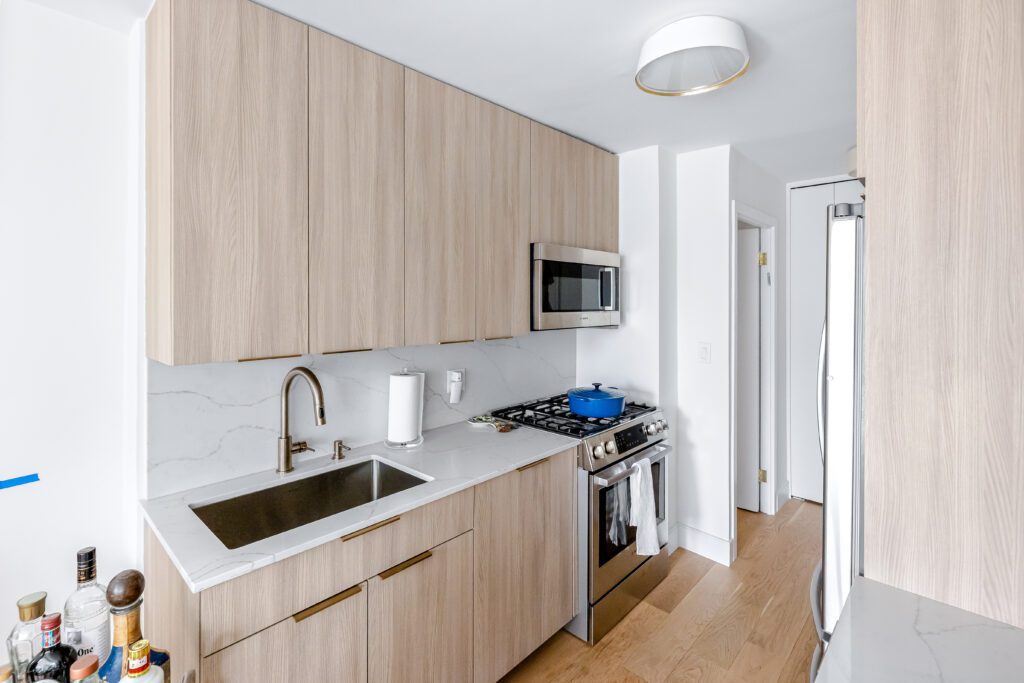
Cabinets are the backbone of any NYC kitchen renovation. They take up more visual space than countertops, appliances, or backsplash combined, which means the style you choose sets the tone for your entire home. Whether you own a pre-war co-op in Manhattan, a brownstone in Brooklyn, a family home in Queens, a townhouse in the Bronx, or a house in Staten Island, choosing the right kitchen cabinets is one of the most important decisions in a kitchen remodel. We proudly serve homeowners across all five boroughs of New York City, and this guide breaks down the major kitchen cabinet styles, materials, and construction types so you can plan your renovation with confidence. Popular Kitchen Cabinet Styles for NYC Homes Shaker Cabinets Shaker cabinets are the most popular cabinet style across NYC kitchens, and for good reason. Shaker doors have a simple recessed center panel framed by clean, flat rails and stiles. The look is timeless, pairs with almost any design aesthetic including modern, farmhouse, and transitional kitchens, and tends to hold resale value better than trendier options. This makes shaker cabinets a top choice for kitchen remodels in Brooklyn brownstones and Manhattan apartments alike. Flat Panel or Slab Cabinets A single flat piece of material with no raised or recessed detailing. This is the go to choice for modern and minimalist kitchens, especially in smaller apartments where a clean, uninterrupted line can make the whole room feel more open. Slab doors show wood grain or paint color with nothing to distract from it, but they also show fingerprints and smudges more readily than textured doors. Raised Panel Cabinets The traditional, more ornate option, with a center panel that sits higher than the surrounding frame, often with decorative edges. Common in classic and colonial kitchen designs found in Staten Island and the Bronx homes with more traditional architecture. Beadboard Cabinets Featuring vertical grooved paneling, beadboard doors bring a cottage or farmhouse feel. Often used on kitchen islands or as an accent piece rather than throughout an entire kitchen. Louvered Cabinets Featuring horizontal slats similar to shutters, these are less common in food prep areas since grease and moisture collect in the grooves, but they occasionally appear on pantry doors or laundry adjacent cabinetry for ventilation. Best Kitchen Cabinet Materials Solid Wood The gold standard for durability and resale value. Common species include maple, oak, cherry, and white oak, which is currently trending for its light, warm grain. Solid wood can be stained or painted and will last decades with proper care, though it is also the most expensive option and can expand or contract with humidity changes common in older NYC buildings. Plywood A strong, stable alternative to solid wood, made of layered wood veneers glued under pressure. Plywood resists warping better than solid wood in humid conditions and is often used for cabinet boxes even when doors are solid wood. MDF (Medium Density Fiberboard) An engineered wood product made from compressed wood fibers. MDF takes paint beautifully with a smooth, seamless finish, making it a favorite for flat panel and painted shaker cabinets. It is more affordable than solid wood but more prone to damage from water and heavy impact. Particleboard or Melamine The most budget friendly option, typically used in laminate or thermofoil cabinets. Fine for rental properties or lower traffic kitchens but generally not recommended for a long term primary residence due to durability concerns. Thermofoil A vinyl layer heat fused over an MDF substrate. Thermofoil offers a smooth, seamless look at a lower price point than painted wood, but it can peel or bubble over time, especially near heat sources like the stove or dishwasher. For a real-world example, our recent Upper East Side kitchen renovation features custom light wood cabinetry that maximizes storage while keeping a warm, natural look, proof that solid wood doesn’t have to feel heavy or dated in a compact city kitchen. Cabinet Construction Types Framed Cabinets The traditional American construction method, with a face frame attached to the front of the cabinet box. Framed cabinets are sturdy and offer design flexibility with inset, full overlay, or partial overlay doors, but slightly reduce interior storage space. Frameless or Full Access Cabinets Also called European style cabinets, these skip the face frame entirely, so doors attach directly to the cabinet box. This maximizes interior storage and creates a cleaner, more streamlined look, popular in modern kitchens. Inset Cabinets Doors sit flush within the face frame rather than overlaying it, creating a refined, custom furniture look. This is the most labor intensive and expensive construction method because it requires precise, consistent gaps around every door and drawer. Cabinet Finish Options Painted: Any color, smooth and consistent finish, best on MDF or engineered substrates. Stained: Highlights natural wood grain, best on solid wood or wood veneer. Glazed: An aged, antiqued look achieved by adding a tinted glaze into the crevices of a raised or recessed panel. Two Tone: A growing trend pairing a darker island or lower cabinets with lighter upper cabinets, or vice versa, to add visual interest without overwhelming a small NYC kitchen. How to Choose the Right Kitchen Cabinets for Your NYC Home Set your budget first. Cabinets typically account for 30 to 40 percent of a total kitchen remodel budget in NYC, so this decision drives everything else. Match the style to your building’s architecture. A slab front modern cabinet can look out of place in a pre war building with ornate molding, just as raised panel traditional doors can feel heavy in a sleek new construction condo. Prioritize construction quality over trendy finishes. A well built plywood box with solid hinges will outlast a beautiful door front on a cheap frame. Think about maintenance. Busy households with kids or heavy cooking should lean toward more forgiving materials like painted maple or plywood over thermofoil or high gloss lacquer, which show every scratch and fingerprint. Don’t skip the hardware. Handles, pulls, and hinges are a small cost relative to the cabinets
What Happens During a Fire Damage Inspection?

After a fire, the visible damage naturally gets the most attention. Burned cabinets, blackened walls and broken windows are difficult to miss. But a professional fire damage inspection looks beyond the most obvious room and asks a more important question: how far did the effects of the fire actually travel? Heat, smoke, soot and firefighting water behave differently. A room without visible flames may still contain affected materials, while a heavily stained surface may be cleanable. The inspection creates the information needed to separate assumptions from an actionable restoration plan. First, Is the Property Safe to Enter? A restoration inspection does not replace clearance from the fire department or another authority responsible for site safety. No one should enter simply because the flames are out. The American Red Cross home-check guidance warns residents to watch for exterior structural damage, loose utilities, unstable objects and sagging ceilings or floors. If authorities have restricted entry, wait for their direction. Once access is permitted, the restoration team can begin documenting conditions without disturbing more of the scene than necessary. The Inspector Establishes the Fire’s Path The room where the fire started is only one part of the assessment. The inspector considers where flames, heat and smoke moved and which adjoining spaces may have been affected. Doors that were open or closed can influence smoke travel. So can ventilation, air pressure and the layout of the home. In an apartment, smoke may move into closets, hallways or neighboring spaces even when the fire itself remained contained. Understanding that path helps determine where closer examination is needed. It also prevents the repair plan from stopping at a convenient doorway when contamination continued beyond it. Structural and Building Materials Are Examined The assessment may identify visibly burned framing, damaged drywall, weakened doors, cracked glazing or surfaces distorted by heat. Conditions that raise structural questions should be evaluated by the appropriate licensed professional. The inspector also looks for materials that may have lost their integrity even if they remain in place. Drywall can conceal affected insulation or framing. Flooring may hide damage below the finished surface. Cabinet boxes can absorb smoke or water differently from their doors. The purpose is not to assume everything must be removed. It is to establish which materials appear restorable, which need more evaluation and which are clearly beyond repair. Smoke and Soot Are Mapped Soot is not always evenly distributed. It can collect around openings, on cooler surfaces and inside enclosed areas. Smoke residue may appear as discoloration, a fine film or a persistent odor. An inspection records the affected rooms and material types because a cleaning approach suitable for tile may not be appropriate for unfinished wood, fabric or painted drywall. NYTDR’s existing guide to what soot does to a home after a fire provides additional context on why residue should not be treated like ordinary household dust. Moisture Is Part of the Fire Assessment Water used during suppression can travel through floors, walls and ceilings. A surface may dry on the outside while moisture remains within an assembly. The inspector may document staining, swelling, sagging, warping and other evidence of water exposure. Moisture readings or further investigation may be needed in affected areas. This connection is easy to overlook when the fire damage appears more dramatic. Read why firefighting can leave water damage behind to understand how both losses can become part of one restoration project. Personal Property Is Considered Separately Furniture, clothing, electronics, artwork and documents do not all respond to heat, smoke and water in the same way. The building inspection may note affected contents, but specialized evaluation may be needed before deciding what can be treated or safely used again. Avoid discarding items simply to clear the room unless they present an immediate hazard and you have been directed to remove them. Photographing and inventorying damaged belongings can preserve information needed later. Documentation Becomes the Restoration Roadmap A useful fire damage assessment should produce more than a verbal impression. Photographs, room notes, measurements and a defined scope help everyone understand what was observed. That documentation can inform cleaning, demolition, repairs, estimates and insurance conversations. It also creates a baseline before work changes the appearance of the property. From there, the next decision is whether each affected component needs cleaning, repair or replacement. Our guide to fire damage cleanup versus repair explains that distinction. Who Should Perform the Inspection? Look for a restoration team that understands both damage assessment and the construction required afterward. Ask how the company documents smoke, soot, moisture and affected contents. Find out whether it can coordinate specialized professionals when structural, electrical or mechanical questions arise. Most importantly, the inspector should be willing to explain what was observed and how those findings translate into the proposed scope. Need a Fire Damage Assessment in NYC? A thorough inspection helps prevent visible damage from becoming the entire story. It connects what happened during the fire with what must happen during recovery. NYTDR offers fire and smoke restoration services for NYC homes and commercial properties, from damage documentation through repairs and reconstruction. Contact NYTDR to schedule a fire damage assessment in New York City.
Fire Damage Restoration in NYC: From Inspection to Reconstruction

A fire can leave a New York home looking completely different in a matter of minutes. Once everyone is safe and the fire department has finished its work, a new set of questions begins. Can you enter the property? What can be cleaned? Which materials need to be removed? Who documents the damage, and who rebuilds the home? Fire damage restoration in NYC is not a single cleaning service. It is a coordinated process that can involve a safety assessment, damage documentation, soot and smoke treatment, water-damage repairs, construction and communication with an insurance carrier. The exact scope depends on what burned, how smoke traveled and how the fire was extinguished. Still, most successful restorations follow the same general sequence. Safety Comes Before the Inspection Do not enter a fire-damaged apartment or house until the fire department or another appropriate authority says it is safe. A space can contain unstable ceilings, damaged wiring, broken glass, contaminated water and hot areas that are not immediately visible. The American Red Cross guidance for returning home after a fire advises staying out until local fire authorities approve re-entry. That instruction should take priority over retrieving belongings or beginning cleanup. In an apartment building, access may also be controlled by building management. Damage in one unit can affect corridors, utility lines or neighboring homes, so the building may need to coordinate inspections before residents return. The Restoration Begins With Documentation Once entry is permitted, the first professional step is usually an assessment. The goal is to understand the full loss before surfaces are cleaned or damaged materials are removed. An inspection may document direct flame damage, heat exposure, soot deposits, smoke migration and the water used during firefighting. It may also identify which rooms and building systems require additional evaluation. Photos, measurements and a written scope create a record of existing conditions. This can support conversations with the property owner, building management, trades and insurance representatives. Our guide to what happens during a fire damage inspection explains what professionals examine and why damage outside the room of origin still matters. Cleanup and Repair Are Different Stages People often use “cleanup” and “restoration” as if they mean the same thing. They are related, but they solve different problems. Cleanup addresses debris, soot, residue and contamination. Repair addresses materials or systems that can no longer perform as intended. A wall may look cleaner after its surface is treated but still require removal because the drywall or insulation behind it was burned or saturated. The same distinction applies to flooring, cabinetry, doors and trim. Some materials may be candidates for professional cleaning. Others may need to be removed and replaced. Read fire damage cleanup vs. fire damage repair for a closer look at how these decisions are made. Smoke Can Travel Beyond the Flames Smoke follows air movement and can enter adjoining rooms, closets and wall cavities. In an NYC apartment, it may also travel through door gaps, shared corridors or mechanical pathways. That is why restoration cannot be planned only around visible black marks. Different materials absorb smoke residue differently, and the source of an odor may not be the surface where it is most noticeable. Painting too soon may temporarily cover discoloration without resolving contamination beneath it. A lasting plan identifies affected materials, treats or removes them appropriately and verifies that the source of the odor has been addressed. If the smell returns after cleaning, see why smoke odors linger after a fire. Firefighting Can Create a Second Type of Damage Water used to suppress a fire can soak ceilings, walls, insulation, floors and personal property. Even areas untouched by flames may require moisture assessment. This is not a reason to delay firefighting; extinguishing the fire is always the emergency priority. It simply means that the restoration scope may include both fire and water damage. Wet materials can become heavy, unstable or difficult to dry within closed assemblies. Our article on water damage after a fire explains why moisture must be evaluated as part of the same restoration plan. The Insurance Scope Should Match the Physical Scope An insurance claim and a construction project use different language, but they need to describe the same damage. The restoration assessment helps establish what was affected and which services may be required. Owners should preserve photographs, reports, inventories and relevant correspondence. Avoid discarding damaged property until the appropriate parties have had an opportunity to document it, unless an item creates an immediate safety hazard and authorities direct otherwise. NYTDR’s insurance damage restoration service explains how inspection records, photographs and itemized scopes can support the claims and restoration process. Coverage depends on the individual policy and circumstances, so questions about coverage should be directed to the insurance carrier or a qualified insurance professional. Reconstruction Restores the Home After unsafe and unsalvageable materials have been removed, affected surfaces treated and the scope agreed upon, reconstruction can begin. The work might include drywall, flooring, cabinetry, painting, electrical repairs, plumbing repairs or a more extensive renovation. In New York City, the project may also require building approvals, professional drawings or permits, depending on the work involved. A coordinated restoration contractor can keep the inspection findings connected to the repair plan. This reduces the chance that cleanup ends with the homeowner still searching for separate teams to rebuild each affected area. Before selecting a company, review how to choose a fire damage repair contractor in NYC. Recovering From Fire Damage in New York City The most reliable fire damage restoration process follows the damage from beginning to end. Safety clearance comes first, followed by inspection, documentation, cleanup, repairs and reconstruction. NYTDR provides fire and smoke damage restoration in NYC, along with insurance documentation and complete reconstruction for affected homes and commercial properties. Contact NYTDR to arrange a fire damage restoration consultation in New York City.
How to Prevent Mold in Your Bathroom

Picture a homeowner in a Brooklyn brownstone who’s spent over a year scrubbing the same dark ring off her shower curtain and tile, only to watch it come back a little faster each time. The cause was never dramatic. Showers with the door closed and the fan off. A damp bath mat left folded on the tile. The curtain bunched shut instead of spreading open to air out. None of it looked like a problem on its own, but together it meant the bathroom never fully dried out, and mold doesn’t need a leak to take hold, just consistent dampness and time. This kind of scenario is just as common as the structural causes people usually picture, and it’s worth understanding both, especially in New York apartments, which behave very differently from the houses most mold advice is written for. Quick gut check: if you have cleaned visible mold in the same spot more than twice, the moisture source has not been fixed, only the mold has been removed. That distinction matters more than any cleaning product. Why NYC Bathrooms Are a Different Problem Most mold prevention content assumes a house with an attic, a crawl space, and a window in every room. New York apartments rarely have any of those things, and that changes the whole equation. Interior, windowless bathrooms rely entirely on mechanical exhaust to remove humidity. There is no cross breeze to fall back on. If that fan is underpowered, poorly maintained, or vented into a wall cavity instead of outside, which we find more often than you would expect during renovations, moisture has nowhere to go but into the surrounding plaster, tile, and grout. Shared plumbing stacks in co-ops and condos mean a slow leak is not always yours to find. Moisture can travel along a pipe chase from the unit above or below and show up as a stain or musty smell with no visible source in your own walls. Radiator heat dries the air unevenly. A bathroom can feel bone dry near the radiator and stay damp in the corner behind the tub for hours after a shower, which is exactly where we find growth starting. Board and co-op approval timelines mean minor leaks often sit unaddressed for weeks or months while paperwork moves, giving moisture far more time to do damage than it would in a house where a homeowner can call a plumber the same day. None of this is meant to be alarming. It is just the actual operating environment, and prevention advice that ignores it is not very useful to you. What Causes Mold in a Bathroom Mold needs three things to establish itself: moisture, a food source such as soap film, dust, or drywall paper, and time without disruption. In a bathroom, the moisture is almost never the obvious splash you can see. It comes from a small number of specific, mostly hidden places. Cracked grout or caulk where the tub meets the tile. This is the single most common failure point we see. Grout is porous by design; it is only water resistant when properly sealed, not waterproof on its own. Once a hairline crack opens at the tub to tile joint, which is completely normal after a year or two of a building settling and temperature cycling, water gets behind the tile with every shower and never fully dries between uses. A failing wax ring or flange under the toilet. A toilet that rocks even slightly, a faint but persistent odor near the base, or discoloration at the floor are the tells. This is a slow, low volume leak, not dramatic enough to notice quickly, but constant enough to saturate subfloor and drywall over months. An exhaust fan that runs but does not actually vent outside. A fan that is loud and moves air does not guarantee it is venting anywhere useful. In older buildings, we regularly find fans that dead end into a wall cavity, an attic space, or a capped duct left over from a previous renovation. If your mirror is still fogged ten or more minutes after a hot shower with the fan running, that is the tell. The fan is circulating humid air, not removing it. An aging shower pan membrane, in bathrooms with tiled rather than prefab shower floors. These fail quietly under the tile, and by the time you see a stain on the ceiling of the room below, the leak has usually been active for a while. Condensation on window sills and frames, in bathrooms that do have an exterior window. Water collects in the frame track and sits there because nobody wipes down a windowsill they cannot easily reach over a tub. General excess humidity that never fully clears, especially in windowless bathrooms that depend entirely on mechanical ventilation and where that ventilation is undersized or poorly maintained. To summarize, Cause Early Sign to Watch For Cracked grout or caulk at the tub seam Faint musty smell before any visible mold Failing toilet wax ring Toilet rocks slightly, faint odor near base Exhaust fan not venting outside Mirror stays fogged well after fan runs Aging shower pan membrane Ceiling stain in the room below Window frame condensation Water pooling in the frame track Undersized or poor ventilation overall Bathroom feels humid long after a shower How to Prevent Mold in Your Bathroom Once you know where moisture actually comes from, prevention stops being guesswork. These are the habits and checks that close off each cause above, roughly in order of how much impact they have. Squeegee or towel dry the tub walls and window sill after every shower. This single habit removes most of the standing moisture before it ever becomes humidity sitting in the room. It takes ten seconds and is the highest value habit on this list because it addresses the water before it becomes a lingering problem. Check the tub to tile seam once a month. Run a finger along it. If you feel any
NYC Apartment Storage Solutions: How to Maximize Every Square Foot
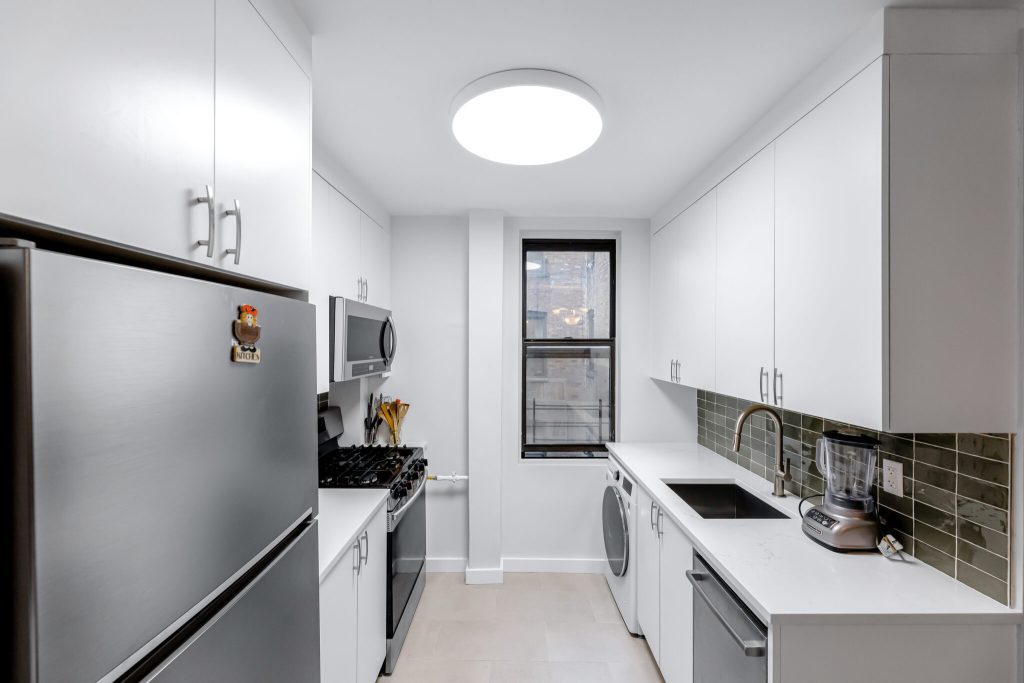
If you live in a New York City apartment, you already know the challenge: too much stuff, not enough space. Whether you’re in a pre-war walk-up in the Upper West Side, a high-rise condo in Midtown, or a Brooklyn brownstone, storage is almost always the number one pain point. The good news? With the right NYC apartment storage solutions, even the smallest spaces can feel organized, functional, and surprisingly spacious, without sacrificing style. In this guide, we’ll walk you through the most effective strategies for maximizing storage in NYC apartments, from custom millwork and multi-functional furniture to kitchen and bathroom upgrades that make a real difference. Why Storage Is Different in NYC Apartments NYC apartments present challenges you simply don’t find in other cities: Older building quirks. Pre-war and landmarked buildings often have uneven walls, sloped ceilings, and irregular floor plans that make standard off-the-shelf furniture a poor fit. Limited square footage. The average NYC apartment is roughly 750 sq ft, well below the national average. Co-op and condo board restrictions. Structural changes require board approval and must comply with NYC building codes, which adds a layer of complexity most renovation guides ignore. Vertical space is underused. Most apartments have 8–10 ft ceilings that go completely untapped. Understanding these constraints is the first step to solving them. Go Vertical: Floor-to-Ceiling Custom Millwork In NYC, vertical storage is your biggest untapped asset. Off-the-shelf shelving units rarely work well in older buildings where perfectly plumb, square walls are the exception. Custom floor-to-ceiling cabinetry, scribed directly to your wall profile, eliminates the awkward gaps that collect dust and make small rooms feel cluttered. What you can store in integrated floor-to-ceiling units: Seasonal clothing and outerwear Portable AC units and fans Extra linens and household essentials Books, media, and display items Because they’re built into the architecture, these units feel like part of the apartment, not furniture placed inside it. That visual continuity alone makes a room feel larger. Pro tip: In buildings with high ceilings, the top 18–24 inches of a cabinet is ideal for rarely used seasonal items, keeping everyday essentials at eye level and within easy reach. Architectural Wall Niches: Storage That Doesn’t Take Up Floor Space One of the most underutilized strategies in NYC apartment renovation is recessed wall storage. During renovation, experienced contractors can identify opportunities within non-load-bearing partitions, bathroom zones, and areas surrounding plumbing chases to integrate built-in niches. When structurally and legally feasible, these recessed shelves provide meaningful storage without encroaching on your floor plan at all. Common applications include: Living room niches for books, art, and décor Bathroom recesses for toiletries and towels Hallway alcoves for keys, mail, and everyday essentials This approach requires working with a contractor who understands NYC building regulations, not every wall can be altered, and permits may be required. Multi-Functional Furniture: Every Piece Should Pull Double Duty In a city where every square foot carries a price tag, single-purpose furniture is a luxury you can’t afford. The most effective small-space interiors are built around pieces that serve two or more functions simultaneously. Here’s a breakdown of the best options for NYC apartments: Furniture / Solution Primary Use Hidden Storage Benefit Storage Ottoman Seating / footrest Blankets, books, electronics Sofa Bed Living room seating Guest sleeping space Lift-Top Coffee Table Surface area Remotes, chargers, office supplies Bed with Drawers Sleeping Clothing, linens, seasonal items Custom Closet System Wardrobe Maximized hanging, shelving, and drawer space Entryway Bench with Storage Seating at entry Shoes, coats, bags Banquette Seating Dining Concealed household or seasonal storage Smart Kitchen Cabinetry Cooking storage Pull-out pantries, deep drawers, appliance garages When selecting multi-functional furniture, prioritize pieces with clean lines and concealed storage, exposed clutter, even in well-organized apartments, makes small spaces feel cramped. Kitchen Storage Solutions for Small NYC Apartments The kitchen is often the hardest-working room in a NYC apartment and the most storage-challenged. Here’s where smart planning pays off most. Toe-Kick and Over-Fridge Cabinetry Two of the most overlooked kitchen storage zones: Toe-kick drawers The recessed space beneath your lower cabinets can be fitted with shallow pull-out drawers, ideal for flat bakeware, cutting boards, and trays. Over-refrigerator cabinetry The space above a counter-depth fridge is often dead space. Custom cabinetry here can hold bulky appliances used only occasionally, like stand mixers, food processors, or large serving pieces. Layout Reworking Sometimes the best storage solution is a better floor plan. By eliminating wasted corner space, repositioning the refrigerator, or converting a galley kitchen to an open layout, you can gain usable square footage without expanding the room’s footprint at all. Pull-Out Pantry Systems A full-height pull-out pantry unit, even just 6–9 inches wide, can store an impressive amount of dry goods, canned food, and spices in a fraction of the floor space a traditional pantry requires. Bathroom Storage in Compact NYC Apartments NYC bathrooms are notoriously small. The average bathroom in an NYC apartment can be under 40 sq ft, making every inch count. Floating Vanities and Wall-Mounted Fixtures Floating vanities expose the floor beneath them, making bathrooms feel visually larger while simplifying cleaning. Pair with wall-mounted toilets (where plumbing allows) for a similar effect. Recessed Shower Niches A built-in shower niche eliminates the need for hanging caddies or freestanding shelves, keeping toiletries organized and the shower area visually clean. These can typically be integrated into non-load-bearing walls during renovation. Mirrored Medicine Cabinets A recessed mirrored medicine cabinet provides bathroom storage and mirror functionality, two essentials in one wall-mounted unit. In small bathrooms, this is almost always preferable to a flat mirror with a separate storage solution. Navigating NYC Building Codes and Board Approvals This is where any NYC renovation projects may stall, or get into legal trouble. Any structural modification in a NYC apartment, including altering partitions, creating lofted storage, or adding built-in millwork that affects building systems, may require: NYC Department of Buildings (DOB) permits Co-op or condo board approval Review by a licensed architect or engineer Working with a renovation company that has deep
What Can Delay NYC Renovation Projects?

Renovating in New York City is rarely delayed for just one reason. In most cases, timelines shift because so many moving parts are involved at the same time, including approvals, buildings, insurance, trades, materials, and ongoing decision-making throughout the project. In NYC renovations, delays often increase when multiple vendors and contractors are managed separately rather than through one coordinated team overseeing the full process. This can create communication gaps, scheduling conflicts, approval delays, and missed details throughout the renovation process. At NYTDR, we operate as an all-in-one restoration and renovation company, managing everything under one roof from insurance coordination through full construction completion. This helps streamline communication and reduces the need for homeowners to coordinate with multiple parties throughout the project. Here’s what commonly causes renovation timelines to shift throughout NYC projects. 1. Insurance Scope and Approvals For renovation projects that follow water, fire, or structural damage, insurance is often part of the process. Delays typically happen when: The scope of work is interpreted differently between the insurer and contractor Documentation is incomplete or requires revisions Approvals move between multiple parties before being finalized Even when physical work could begin, projects often pause while the insurance scope is clarified and aligned with actual construction requirements. This early-stage misalignment is one of the most common sources of timeline disruption in restoration-related projects. 2. DOB Filings and Approval Cycles In NYC, renovation work is tightly regulated through the Department of Buildings. Even with complete drawings, approvals move through structured review cycles that can include: Examiner comments requiring revisions Multiple rounds of plan submissions Filing classification clarifications A project is often “ready” on paper long before it is approved in practice. That gap between readiness and approval is a major contributor to early project delays throughout New York City renovations. 3. Co-op and Condo Board Requirements For many NYC apartments, especially co-ops and condos, building approval is another essential layer in the process. Delays often come from: Alteration agreement review timelines Board meeting schedules which are often monthly Insurance and compliance documentation requirements Additional conditions imposed by building management Even when all documents are submitted correctly, timing is dictated by the building’s internal schedule — not the project schedule. In some cases, this alone can shift a start date by several weeks. 4. Trade Coordination and Sequencing Issues Renovation work depends heavily on sequencing. One trade must finish before the next can begin: Plumbing and electrical before walls are closed Inspections before finishing work Flooring before cabinetry installation in many cases Delays occur when trades are not tightly coordinated or when one trade runs behind schedule, causing a ripple effect across the entire project. In NYC, where multiple projects run simultaneously across the city, scheduling gaps between phases are common. 5. Material Lead Times and Availability Material selection and procurement are another major delay factor. Common issues include: Custom cabinetry or millwork production timelines Imported tile or stone shipping delays Fixture backorders or substitutions Late-stage design changes requiring reorders A single delayed item can hold up multiple phases of work if it sits on the critical path of the project. This is especially common in kitchens and bathrooms, where multiple systems and finish materials depend on one another to move forward. 6. Building Access and Working Restrictions NYC buildings often have strict rules that directly affect construction timelines. Many co-ops, condos, and residential buildings limit working hours to certain weekdays and times, reducing how many hours crews can work each day. Construction schedules can also be affected by: Elevator reservation systems for material deliveries, debris removal, and contractor access Noise restrictions Required protection for hallways, elevators, and common areas While these rules are standard throughout New York City, they still impact how quickly work can move on site. Even well-planned renovation schedules can shift depending on building access and availability. 7. Unexpected Conditions Behind Walls One of the most unpredictable delay factors is what gets uncovered once demolition begins. In older NYC buildings, it is common to find: Outdated electrical or plumbing systems Previous unpermitted work Structural irregularities Hidden water damage or mold behind finishes These discoveries require immediate evaluation and sometimes redesign before work can continue safely and compliantly. While these issues are not unusual, they do impact timelines because they are not visible until work begins. 8. Decision Delays During Construction In NYC renovations, delays can happen when finish selections, materials, or key design decisions are not finalized at the stage they are needed while work on site is ready to move forward. In some cases, unexpected field conditions may also require quick decisions before the next phase can continue. Even short pauses in decision-making can affect multiple stages of a project. Because trades are scheduled in sequence, one delayed decision can push back several downstream phases already planned to follow. This is one of the most overlooked reasons renovation timelines extend in NYC, as the impact of a small delay often becomes visible only after it affects multiple parts of the schedule. At NYTDR, we guide homeowners through these decisions early in the process, helping them select materials and finishes that fit both the space and the overall project timeline to reduce unnecessary delays during construction. How To Help Avoid Renovation Delays in NYC While some delays are unavoidable in NYC renovations, many can be reduced with the right planning and coordination. Finalize design, materials, and finish selections early before construction begins or reaches that stage Understand and secure all building requirements in advance, including approvals, insurance, and access rules Coordinate all trades and vendors through a clear schedule to avoid gaps, overlaps, and miscommunication Order long-lead materials early to prevent supply-related delays Make decisions quickly when unexpected conditions arise during construction Even with strong planning, some delays can still occur in NYC renovations, but these steps help keep projects moving more efficiently. Our Commitment at NYTDR We manage restoration and renovation projects end-to-end, from insurance coordination through full construction completion, keeping everything under one roof. This allows us
Best Time of Year to Start a Home Renovation Project

Starting a home renovation is a major investment, and timing plays a bigger role than many homeowners realize. The best time of year to renovate depends on the type of project, weather conditions, contractor availability, and even your household schedule. While some renovations can be done year-round, choosing the right season can help reduce costs, minimize disruption, and keep your project on track. Below, we break down the advantages and challenges of renovating in each season, followed by guidance on the best timing based on specific renovation types. Spring Renovations (March to May) Spring is often seen as a fresh start, making it a popular time for home improvement projects. Milder temperatures and longer daylight hours make this season ideal for outdoor work and structural upgrades. AdvantagesSpring weather is well suited for exterior renovations such as roofing, siding, painting, and landscaping. Concrete work and home additions also benefit from moderate temperatures that allow materials to cure properly. Many homeowners like to start projects in spring so they’re completed before summer. Things to ConsiderBecause demand increases in spring, contractors’ schedules can fill quickly. This may mean longer wait times or higher pricing. Planning and booking early is essential if you want to start a spring renovation. Summer Remodels (June to August) Summer is the busiest season in the renovation industry, especially for interior projects like kitchens and bathrooms. AdvantagesFamilies who travel or take extended holidays often choose summer for major indoor renovations, as it reduces day-to-day disruption. The dry weather is also reliable for projects that involve opening walls, replacing windows, or upgrading plumbing and electrical systems. Things to ConsiderHigh demand means contractors are often booked months in advance. Pricing may be higher, and flexibility is limited. Heat can also slow down certain types of work, particularly exterior labor. Fall Renovations (September to November) Fall is widely considered one of the best times of year to begin a home renovation, offering a balance of good weather and improved contractor availability. AdvantagesAs summer projects wrap up, contractors tend to have more availability. Temperatures are comfortable for both indoor and outdoor work, making fall a great time for a wide range of renovations. Many homeowners find scheduling easier and timelines more predictable during this season. Things to ConsiderExterior projects should be planned carefully to finish before colder weather sets in. Shorter days can also slightly affect work schedules. Winter Upgrades (December to February) Winter is the quietest season for most renovation professionals, making it an excellent option for certain types of projects. AdvantagesIndoor renovations such as painting, flooring, cabinetry, and basement remodels are well suited for winter. With lower demand, homeowners may benefit from more flexible scheduling and potential cost savings. Contractors can often dedicate more attention to individual projects during this time. Things to ConsiderExterior work is usually limited due to cold temperatures, snow, and moisture. Indoor projects should be planned around holidays if you’re hosting or spending more time at home. Cold weather can make existing issues such as drafts, leaks, or insulation problems more noticeable. While winter is ideal for many indoor renovations, exterior damage may need temporary protection until conditions allow for permanent repairs. Best Time to Renovate by Project Type Kitchen and Bathroom Renovations Summer works well if you plan to be away during construction, while fall is a strong alternative when contractors are less busy and timelines are easier to manage. Exterior Renovations (Roofing, Siding, Exterior Painting) Spring and early fall provide the most reliable weather conditions, helping ensure quality results and fewer delays. Home Additions and Concrete Work These projects perform best in spring or early fall when temperatures are stable and materials can cure correctly. Interior Renovations (Flooring, Painting, Built-Ins) Winter is often ideal for interior-focused work, allowing projects to move quickly without peak-season pressure. When We Recommend Starting a Home Renovation At NYTDR, we recommend early fall, typically September through October, as the best overall time to start a home renovation. During this period, weather conditions are generally stable, contractor availability improves after the busy summer season, and project schedules tend to be more predictable. This combination helps reduce delays and allows renovations to move forward more efficiently. While weather can impact certain exterior projects, most interior renovations can be completed year-round. Early fall provides conditions that support both interior and exterior work without the extremes of summer heat or winter cold, making it the most reliable starting point for a wide range of renovation projects. So why is spring not always the ideal starting point? Although spring is a popular time to plan renovations, it is also one of the busiest periods for contractors. Higher demand can result in tighter schedules, longer lead times, and reduced flexibility once work begins. Spring weather can also be inconsistent, with rainfall and temperature fluctuations that may affect certain exterior phases. For many homeowners, early fall offers a more predictable and efficient start compared to the challenges that often come with spring scheduling. Key Factors to Consider When Timing Your Renovation Contractor AvailabilityLess popular renovation periods, such as winter and late fall, often offer better access to skilled crews and more flexible start dates. Project CostsRenovating during slower seasons can sometimes reduce labor costs and allow for better pricing on materials. Weather ConditionsExterior work is heavily influenced by temperature and moisture. Mild seasons help avoid weather-related delays. Holidays and LifestyleIf you plan to host guests, avoid starting major indoor renovations right before holidays or special events. Final Thoughts There’s no single perfect time to renovate, but choosing the right season for your specific project can make a noticeable difference in cost, convenience, and overall experience. Fall and early spring often provide the best balance, while winter is ideal for indoor upgrades and summer works well for families who can step away during construction. Planning ahead and working with an experienced renovation team will help ensure your project starts at the right time and finishes smoothly, no matter the season. Ready to start your home renovation at
Small Bathroom Layout Ideas to Maximize Space

Designing a small bathroom in New York City doesn’t mean sacrificing comfort or style. With tight floor plans, older buildings, and strict plumbing constraints, smart layout decisions matter more than ever. The right approach can make even a compact Manhattan bathroom feel open, functional, and thoughtfully designed. Below are the most effective small bathroom layout ideas, with practical guidance on how each one helps maximize space. One-Wall Bathroom Layout A one-wall layout places the sink, toilet, and shower or tub along a single wall. This layout works especially well in narrow bathrooms or powder rooms. Keeping plumbing on one wall reduces visual clutter and frees up floor space. To maximize space, use a wall-mounted vanity, a compact toilet, and a walk-in shower with clear glass. Vertical storage, such as recessed shelves or tall cabinets, helps keep essentials accessible without crowding the room. Corner and Walk-In Shower Layout Replacing a traditional tub with a corner or walk-in shower is one of the most effective ways to open up a small bathroom in Manhattan. Corner showers take advantage of underused space and improve traffic flow, while walk-in or curbless designs remove visual barriers and create a seamless transition across the room. Frameless glass enclosures, single glass panels, and continuous flooring help maintain open sightlines and make the space feel larger. Large-format tiles enhance the sense of scale, and built-in niches eliminate the need for bulky shelving. Tub-Shower Combination Layout A tub-shower combo is a smart solution when space is limited but functionality is essential. Positioning the tub along the longest wall maximizes efficiency. Sliding glass doors or a clear shower screen prevent the space from feeling boxed in. Built-in storage above or beside the tub can replace freestanding shelves and keep the layout streamlined. Floating Vanity Layout A floating vanity creates the illusion of more floor space while offering practical storage. By lifting the vanity off the floor, the bathroom feels less crowded and easier to clean. Choose drawers instead of cabinets for better organization, and pair the vanity with a wall-mounted faucet to save counter space. Adding lighting underneath the vanity enhances the sense of openness. Wall-Mounted Toilet Layout Wall-mounted toilets are ideal for compact bathrooms where every inch matters. With the tank hidden inside the wall, this layout frees up valuable floor area and simplifies cleaning. The reduced footprint allows more flexibility for vanity size or shower placement, making the bathroom feel more spacious and modern. Galley-Style Bathroom Layout A galley layout places fixtures along opposite walls, creating a central walkway. This works well in long, narrow bathrooms. Keeping fixtures aligned and evenly spaced prevents the room from feeling cramped. Use shallow-depth vanities and mirrored surfaces to reflect light and widen the visual footprint of the space. Wet Room Layout A wet room combines the shower area with the rest of the bathroom floor. This layout removes physical barriers and maximizes usable space. Waterproofing the entire room allows for flexible fixture placement and easy maintenance, while proper floor slope, sealed membranes, and professional installation help prevent water damage and moisture issues. Minimal glass panels and consistent flooring create a seamless, open feel that works especially well in very small bathrooms. Powder Room Layout Optimization Even the smallest bathrooms can benefit from smart layout planning. In powder rooms, prioritize a compact sink and a slim-profile toilet. Wall-mounted sinks or corner basins free up legroom, while a large mirror enhances depth. Simple, uncluttered design choices make the space feel intentional rather than tight. Smart Storage Layout Solutions Storage placement plays a major role in how spacious a small bathroom feels. Recessed medicine cabinets, built-in niches, and floor-to-ceiling shelving maximize storage without reducing floor space. Keeping storage integrated into the layout prevents overcrowding and maintains clean lines throughout the bathroom. To Summarize: Designing a small bathroom in New York City requires careful planning and smart layout decisions. With limited square footage, older building conditions, and plumbing constraints, the right layout can significantly improve both functionality and comfort. Thoughtful design choices help compact bathrooms feel more open, efficient, and visually balanced. Key small bathroom layout ideas covered in this guide include: One-wall bathroom layouts that keep plumbing efficient and reduce visual clutter Corner and walk-in shower layouts that open up floor space and improve movement Tub-shower combination layouts that balance functionality and space efficiency Floating vanity layouts that create the illusion of more floor space and improve storage Wall-mounted toilet layouts that reduce fixture footprint and simplify cleaning Galley-style bathroom layouts that improve flow in long, narrow spaces Wet room layouts that maximize usable space with seamless, barrier-free design Powder room layout strategies that make even the smallest bathrooms feel intentional Smart storage solutions that use vertical and recessed space without crowding the room When these layout strategies are combined with space-saving fixtures, clear sightlines, and integrated storage, small bathrooms can feel both practical and well designed. With the right approach, even a compact NYC bathroom can be transformed into a space that feels comfortable, functional, and built to last. If you’re considering an NYC bathroom renovation, NYTDR is here to help. We work closely with you to design a layout that fits your space, your needs, and your style, then handle the entire renovation process with care and attention to detail. The result is a bathroom that feels thoughtfully designed and built to last. Ready to start your bathroom dream? Contact NYTDR today to schedule a free consultation!
Understanding Ice Dam Damage and What Your Policy Does and Doesn’t Cover

Ice dams are a common winter roofing issue for homes in colder climates throughout the United States. While they may start as harmless-looking ridges of ice along a roof’s edge, the damage they cause inside a home can be extensive. Water intrusion, mold growth, and structural issues often follow, sometimes leaving homeowners with costly repairs and unexpected insurance surprises. By understanding how ice dams form, what causes them, and how insurance companies treat this type of damage, homeowners can better protect their homes and prevent future problems. What Is an Ice Dam? An ice dam is a buildup of solid ice that forms at the lower edge of a roof, typically near the eaves or gutters. When snow accumulates on the roof and the temperatures fluctuate, parts of the snow begin to melt. As the water flows down the roof, it encounters colder areas near the edge and refreezes, gradually creating a thick ridge of ice. Once that ice ridge is established, any additional melting snow gets trapped behind it, unable to drain properly. The water begins to pool, and because roofs are not designed to hold standing water, it eventually seeps under shingles and into the home. This process can trigger a chain reaction of damage. Roof decking becomes soaked, insulation loses its effectiveness, and interior walls and ceilings may start showing brown stains or water streaks. Over time, persistent moisture can lead to mold growth, which creates health risks and often requires professional remediation. How Ice Dams Form Ice dams form due to temperature imbalances across the roof. Three major conditions must happen at the same time: snow on the roof, heat leaking from inside the home into the attic, and outdoor temperatures that remain below freezing. Warm air naturally rises from the living spaces into the attic, usually through gaps around pipes, wiring, vents, and unsealed attic access points. If the attic is not properly insulated or ventilated, this warm air heats the underside of the roof. Snow sitting on the warmer areas of the roof begins to melt even when outside temperatures are below freezing. As the water flows down, it reaches the colder and unheated section of the roof near the eaves and gutters. Because this area stays below freezing, the water turns back into ice, gradually building the ice dam. The more heat escapes into the attic, the faster this process happens. That is why homes with poor insulation, limited attic airflow, or uneven roof temperatures tend to experience recurring ice dams each winter. Why Ice Dams Can Cause a Serious Problem Ice dams don’t simply create an icy buildup on the outside of a home. The real threat lies in the water they trap. Roof shingles are designed to shed water that flows downward, not water that pushes upward or sits still. When water pools behind an ice dam, it can find its way under shingles, soak the roof decking, and drip into the home. Some of the most common damage caused by ice dams includes: Interior water damage to ceilings, drywall, and paint Wet or compacted insulation that loses its thermal performance Warping or rotting of wood framing and roof structures Gutter damage due to the weight of the ice Mold and mildew growth inside walls, ceilings, or attic spaces The longer an ice dam remains in place, the more likely it is to cause costly and widespread damage. For a deeper look at what happens after an ice dam forms explore our detailed guide on how snow melt, refreezing, and temperature changes contribute to damage. How U.S. Insurance Policies Handle Ice Dam Damage Homeowners often assume that insurance will automatically cover ice dam damage, but this is not always the case. Key points include: In the United States, homeowners insurance policies typically cover sudden and accidental damage. If melting water from an ice dam leaks into the home and damages ceilings, walls, or insulation, the interior water damage is often covered. However, the circumstances surrounding the damage matter and can affect the outcome of the claim. Insurance companies often evaluate whether the homeowner took reasonable steps to maintain the roof and attic. Claims may be denied if the insurer determines that long-term neglect, insufficient insulation, poor ventilation, or lack of proper maintenance contributed to the damage. In some cases, insurers will cover interior damage but exclude repairs to the roof itself, especially if the shingles were already aging or worn before the ice dam formed. Homeowners should review their policy for exclusions related to roof maintenance. Some policies require homeowners to perform regular roof upkeep or clear excessive snow when possible. Other policies may not cover the cost of removing the ice dam unless the removal is necessary to prevent further damage. By reviewing your policy closely and understanding these conditions, you can better anticipate how your insurer may handle an ice dam claim. When Insurance Typically Covers Ice Dam Damage While coverage varies between insurance companies and individual policies, ice dam damage is generally covered when: The water intrusion happened suddenly and was not part of a long-term leak. The homeowner maintained the roof in reasonable condition. There is no evidence of neglect, deferred maintenance, or pre-existing damage. The ice dam occurred due to natural winter conditions beyond the homeowner’s control. Interior damage was a direct result of the ice dam. Some insurance policies also cover additional living expenses if the homeowner must temporarily leave the home due to severe water damage. How to Prevent Ice Dams Homeowners can significantly reduce the risk of ice dams by improving the attic environment and maintaining their roofing system. The best prevention strategies include: Improving attic insulation. Adequate insulation keeps warm air inside the living areas instead of leaking into the attic. Installing proper attic ventilation. Good ventilation allows cold air to circulate through the attic, keeping roof temperatures stable. Sealing attic air leaks. Even small gaps around chimneys, pipes, exhaust fans, and access panels can allow warm air to escape into